
In Loans, a loan can be linked to the assets it financed. To link assets during the import, they must already be in your register, so add your assets first, then import your loans. This article covers both imports, and how to put several assets on one loan. To check whether your register has Loans, see Am I in the new Loans feature?
Before you start
Your loan file refers to each asset by its asset code or asset ID. If you use asset codes, every asset needs a unique code. Note your asset codes or IDs before you prepare your loan file.
Loans are imported from the Loans screen, not from Add Assets.
Step 1: Add your assets
Select Add Assets, then File Import. Choose the import that fits:
- Import Assets - for setting up a new register with the assets you already hold.
- Bulk Acquisitions - for newly acquired assets that do not need an opening balance.
Select Download CSV Template, fill it in, then select New Import or New Acquisition and upload your file. The import walks you through matching your columns, asset groups and depreciation methods, then asks for the date format before it runs.
Each asset needs a tax and an accounts depreciation method and life. Rows without them are not imported.
Step 2: Import your loans
Select Loans, then Add Loans and File Import. Under Import Loans, select Download CSV Template.
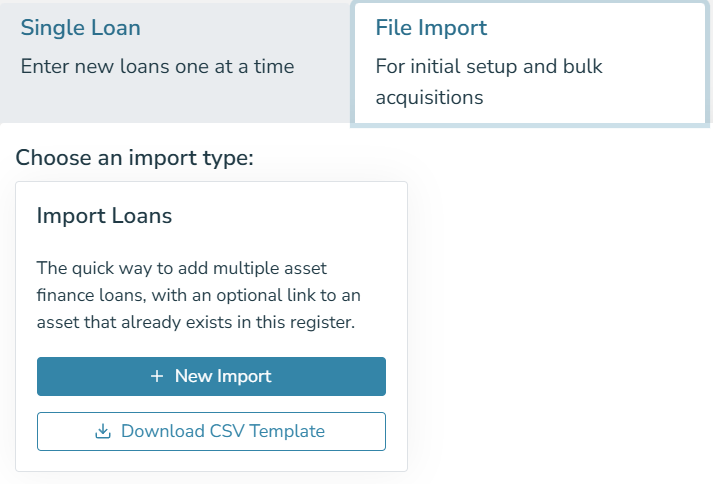 Loans (new) - importing loans from an import file.
Each row in the file creates one loan. For a loan with regular payments, these columns must be filled in:
- Name, Group, Commencement Date and Amount Financed
- First Regular Payment Date, Regular Payment Amount, Payment Frequency and No. of Regular Payments
If you leave Code empty, one is generated. Contract Date defaults to the commencement date, and Loan End Date is calculated from the payment schedule.
If your first or final payment differs from the regular amount, enter it in the First or Last payment columns. No. of Regular Payments counts only the regular payments: do not include a payment you have entered in the First or Last columns. If your first or last payment is the same as the regular amount and you have not entered it separately, include it in the count.
To link a loan to an asset, enter the asset's code in Asset Code (or its ID, if you match by asset ID) and the amount of the loan that financed it in Amount Financed Against Asset. If you leave the amount empty, the whole amount financed is put against that asset.
Select New Import and upload your file. As you go through the import:
- At Choose how to match assets, select Asset Code or Asset Id, depending on what your file uses. If you choose Don't match assets, the loans are imported without assets and you can add them later from each loan's Assets tab.
- At Use Loan Opening Balance Date, select No for loans you are entering from their commencement date. For loans that already existed, or had already been audited, before you moved to AssetAccountant, select Yes and set the opening balance date. See the next section.
- At Payment Schedule, select Regular payments.
- Choose the date format your file uses, then confirm.
 Loans (new) - choosing how loans are matched to assets.
When the import finishes, you see the loans that were created and any rows that could not be imported, with the reason for each. The rows that worked are kept. Download failed rows gives you the rows that were not imported as a file.
Loans that were already running
In your file, enter the loan's original terms: its commencement date, the amount financed and the full payment schedule. AssetAccountant builds the loan's schedule from the commencement date.
With Yes selected, the import asks where the balance at the opening balance date comes from:
- Principal Outstanding - from your file. Your file needs a Principal Outstanding column with the principal owed at that date, so you can match it during the import. Enter the interest accrued at that date in Accrued Interest. If you leave Accrued Interest empty, it is calculated. If you do not want it calculated, enter 0.
- Use amount from original schedule - from the loan's schedule. Use this when you only need to set the date your journals start from.
If the balance you enter differs from the schedule, your figure is used and the difference appears as an Opening Balance entry on the opening balance date in the loan's Transactions tab.
One loan for several assets
Linking several assets to one loan from a file is not available yet. When one loan finances several assets, such as a fleet of vehicles, the simplest way is to import the loan without assets (select Don't match assets), then add all the assets to it:
- Open the loan and select the Assets tab.
- Select Add Existing Assets, tick the assets and select Next.
- Enter the amount financed for each asset. Unallocated shows how much of the loan is not yet assigned to an asset.
- Select Save.
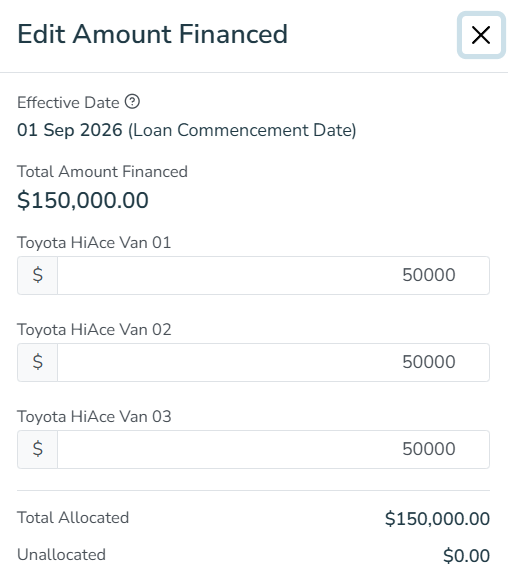 Loans (new) - entering the amount financed for each asset.
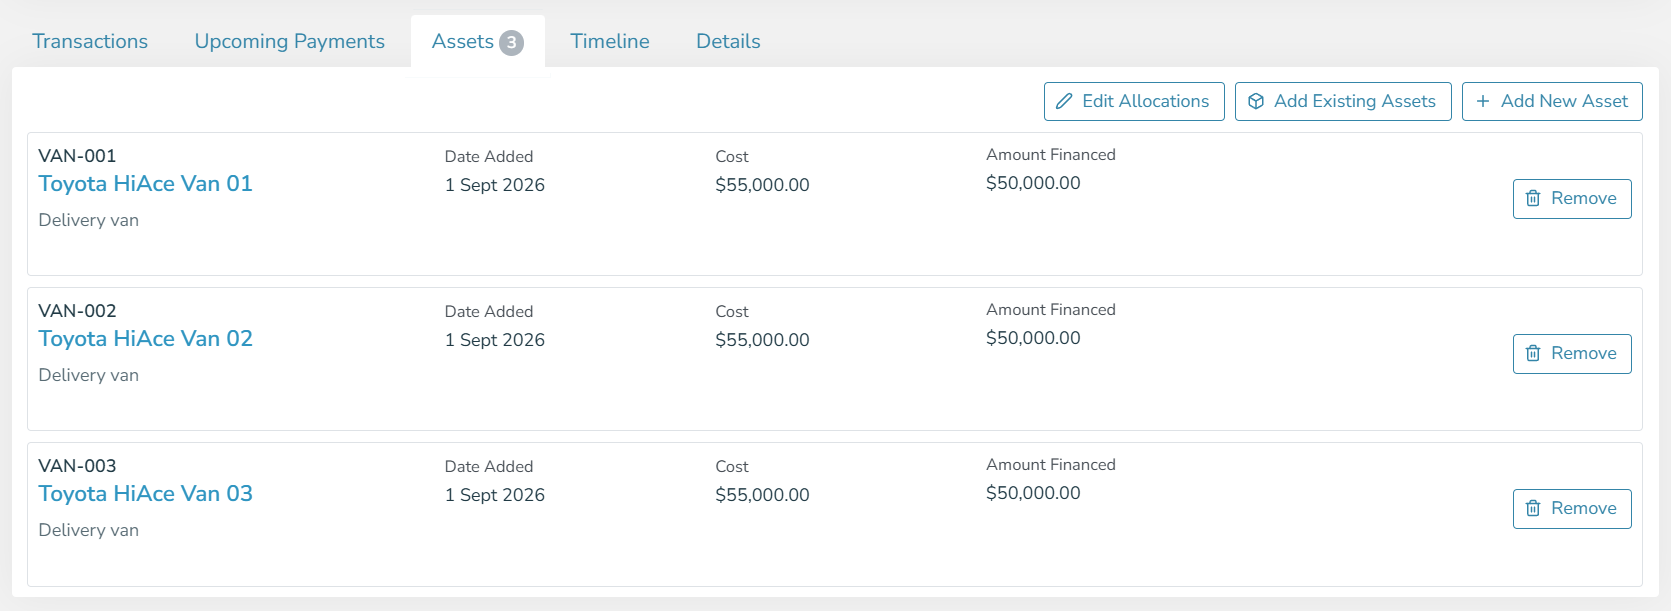 Loans (new) - one loan with three assets on the Assets tab.
Linking more than one asset to a loan is currently available on the Premium plan. For more help, including what to do when an asset on a loan is sold, see One loan for several assets.
Changing the allocation
To change how a loan is split between its assets, open the loan's Assets tab and select Edit Allocations. Change the amounts, check Unallocated, and select Save.
Loans is new and we are still adding to it. Bulk actions for loans are not available yet. See What is coming next in Loans.